Creating Toroid Class
We have already seen how to use the MeshView class directly to create a 3D textured pyramid, this page will describe a more powerful and flexible way of creating user defined 3D shapes. Rather than using an instance of MeshView this program has a user-defined class called Toroid which inherits (extends) MeshView so has all the capabilities of MeshView but allows us to add additional methods needed to create a toroid.
The Toroid class in action!
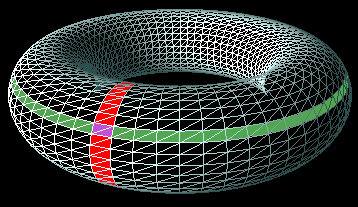
This diagram shows the torus being split into segments. A single ring segment is shown in red and a single tube sgement is shown in green. Unless the user specifies otherwise then there will be 64 ring segments and 32 tube segments. If are interested thats 64 x 32 x 2 or 4096 triangles.
One of the first things our class needs to do is define the mesh vertices. To simplify the algorithm used we will use a 2D array of javafx.geometry.Point3D objects to store the vertex data. Alrhough there are 64 x 32 segments we will use an array of 65 x 33 elements because it will simplify our code. So we have an array
coord = new Point3D[65][33];Since the torus is a closed shape, the array ends must meet therefore -
coord[0][t] = coord[64[t]  for all t in the range 0 to 32 inclusive
coord[r][0] = coord[r][32] for all r in the range 0 to 64 inclusive
The Constructors
The class has 2 constructiors both of which allow the user to specify the ring radius and the tube x and y
radii. Note although the ring is circular the tube crossection can be elliptical.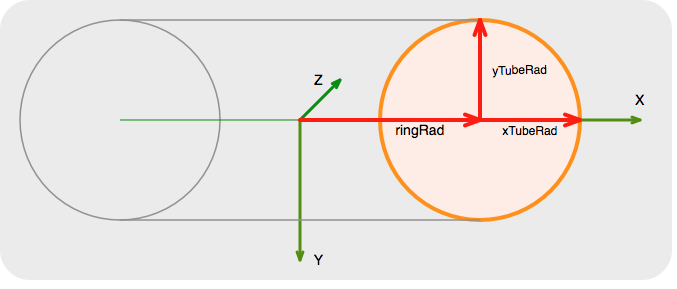
The first few lines are simply setting the size of the torus and the number of segments to use.
public Toroid(float ringRad, float tubeRadX, float tubeRadY, float zeroAngle) {
    this(NBR_RING_SEGMENTS, NBR_TUBE_SEGMENTS, // default 64 x 32
            ringRad, tubeRadX, tubeRadY, zeroAngle
    );
}

public Toroid(int nbrRingSegments, int nbrTubeSegments, float ringRad, float tubeRadX, float tubeRadY, float zeroAngle) {
    this.nbrRingSegments = nbrRingSegments;
    this.nbrTubeSegments = nbrTubeSegments;
    this.ringRad = ringRad;
    this.tubeRadX = tubeRadX;
    this.tubeRadY = tubeRadY;
    this.tubeZeroPos = (float) Math.toRadians(zeroAngle);
    nbrRingSteps = nbrRingSegments + 1;
    nbrTubeSteps = nbrTubeSegments + 1;

    setMesh(new TriangleMesh());
    calcPoints();
    calcTexturePoints(1, 1);
    calcFacesPT();
    // Create the default texture
    PhongMaterial material = new PhongMaterial(Color.BURLYWOOD);
    setMaterial(material);
    // Start with filled shape
    setDrawMode(DrawMode.FILL);
    // Makes it easier to see the wireframe
    setCullFace(CullFace.BACK);
}
The interesting part starts at line 17 when we create the mesh object that JavaFX will use to render the torus. The lines 18, 19 and 20 will
- calculate the vertices for the torroid and store them in the mesh
- calculate the texture coordinates and store them in the mesh.
- calculate the trianglke faces and store them in the mesh
Lines 20 and 21 will set the surface colour of the torus. The torroid class includes methods to set an image as a teture and we will see them later.
Line 25 sets the draw mode to fill so we have a solid torus. and the last line, 27 instructs the computer to only render the faces facing the viewer.
Calculating the vertices.
In this method the 2D array is ceated and the coordinates are calculated. It does this in two stages
- calculate the vertices of the torus cross-section in the plane Z=0, in other words the orange circle shown above.
- calculate all the other points by rotating the points calculated in step 1 about the torus centre [0,0,0].
private void calcPoints() {
    Point3D[][] coord = new Point3D[nbrRingSteps][nbrTubeSteps];
    // Calculate segment size in radians
    float ringDeltaAng = (float) (2 * Math.PI / nbrRingSegments);
    float tubeDeltaAng = (float) (2 * Math.PI / nbrTubeSegments);

    // Calculate the XY coordinates of the tube in the Z=0 plane
    for (int t = 0; t < nbrTubeSteps; t++) {
        float angle = tubeZeroPos + t * tubeDeltaAng;
        coord[0][t] = new Point3D(
                ringRad + tubeRadX * Math.cos(angle),
                tubeRadY * Math.sin(angle),
                0
        );
    }
    // Calculate all the points for all the other ring segments
    for (int r = 1; r < nbrRingSteps; r++) {
        float angle = r * ringDeltaAng;
        float sinA = (float) Math.sin(angle);
        float cosA = (float) Math.cos(angle);
        for (int t = 0; t < nbrTubeSteps; t++) {
            Point3D point0 = coord[0][t];
            coord[r][t] = new Point3D(
                    point0.getX() * cosA,
                    point0.getY(),
                    point0.getX() * sinA
            );
        }
    }
    // Transfer to float array
    float[] points = new float[nbrRingSteps * nbrTubeSteps * 3];
    int idx = 0;
    for (int t = 0; t < nbrTubeSteps; t++) {
        for (int r = 0; r < nbrRingSteps; r++) {
            points[idx++] = (float) coord[r][t].getX();
            points[idx++] = (float) coord[r][t].getY();
            points[idx++] = (float) coord[r][t].getZ();
        }
    }
    TriangleMesh mesh = (TriangleMesh) getMesh();
    mesh.getPoints().setAll(points);
}
The final part (lines 30 41) is to convert the 2D array of type Point3D to a single dimension float array because this is what the mesh needs.
Calculating the texture coordinates [u,v ]
Since we are tiling the torus surface we need a texture coordinate for every vertex. When creating the toroid the program assumes that the image is streched over the entire surface so is not tile. This means that the coordinates will be in the range [0,0] - [1,1].
private void calcTexturePoints(float nbrRingRepeats, float nbrTubeRepeats) {
        float deltaU = nbrRingRepeats / nbrRingSegments;
        float deltaV = nbrTubeRepeats / nbrTubeSegments;
        float[] uv = new float[nbrRingSteps * nbrTubeSteps * 2];
        int idx = 0;
        for (int t = 0; t < nbrTubeSteps; t++) {
            for (int r = 0; r < nbrRingSteps; r++) {
                uv[idx++] = r * deltaU;
                uv[idx++] = t * deltaV;
            }
        }
        TriangleMesh mesh = (TriangleMesh) getMesh();
        mesh.getTexCoords().setAll(uv);
    }
When calling this method the parameters determine how oftenthe image is tiled, in the video above there are 6 ring repeats and 2 tube repeats so the texture coordinates will be in the range [0,0] - [6.0,2.0].
Calculating triangles
The vertex data was stored so that the array index number for ring segment r and tube segment
t is given by the formula r + t * nbrRingSteps so we can calculate the 4 indices
that make up the intersection of a ring and tube segment. 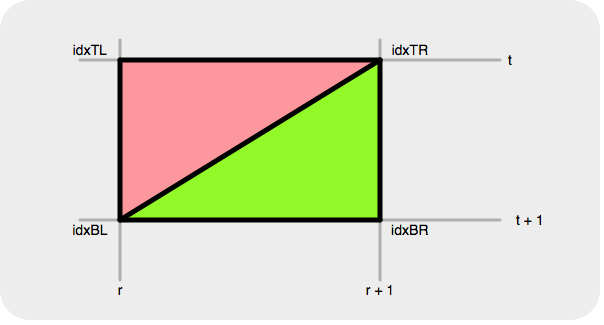 These are calculated in lines 6-9. For each triangle
(pink and green) we have to provide the array element indices for the vertex and texture coordinate data for
each of the three triangle corners. The vertices must be ordered in anti-clockwise order. Since there is 1:1
correspondance between the vertex and texture coordinate array elements which simplifies the algorithm used.
For the green triangle the index order is idxTL ⇒ idxBL ⇒ idxBR and for the green
triangle idxBL ⇒ idxBR ⇒ idxTR.
These are calculated in lines 6-9. For each triangle
(pink and green) we have to provide the array element indices for the vertex and texture coordinate data for
each of the three triangle corners. The vertices must be ordered in anti-clockwise order. Since there is 1:1
correspondance between the vertex and texture coordinate array elements which simplifies the algorithm used.
For the green triangle the index order is idxTL ⇒ idxBL ⇒ idxBR and for the green
triangle idxBL ⇒ idxBR ⇒ idxTR.
private void calcFacesPT() {
    int idx = 0;
    int[] faces = new int[nbrRingSegments * nbrTubeSegments * 12];
    for (int t = 0; t < nbrTubeSegments; t++) {
        for (int r = 0; r < nbrRingSegments; r++) {
            int idxTL = r + t * nbrRingSteps;
            int idxBL = r + (t + 1) * nbrRingSteps;
            int idxBR = r + 1 + (t + 1) * nbrRingSteps;
            int idxTR = r + 1 + t * nbrRingSteps;
            // Top left triangle defined in anti-clockwise order
            faces[idx++] = idxTL;   // Point
            faces[idx++] = idxTL;   // Texture
            faces[idx++] = idxBL;   // Point
            faces[idx++] = idxBL;   // Texture
            faces[idx++] = idxTR;   // Point
            faces[idx++] = idxTR;   // Texture
            // Bottom right triangle defined in anti-clockwise order
            faces[idx++] = idxBL;   // Point
            faces[idx++] = idxBL;   // Texture
            faces[idx++] = idxBR;   // Point
            faces[idx++] = idxBR;   // Texture
            faces[idx++] = idxTR;   // Point
            faces[idx++] = idxTR;   // Texture
        }
    }
    TriangleMesh mesh = (TriangleMesh) getMesh();
    mesh.getFaces().setAll(faces);
}
The last two lines add the triangle data to the mesh.
Adding functionality to the Toroid class
One advantage of creating this class is the ease of creating and manipulating Toroid shapes. For instance to create a new Toroid is as simple as
torus = new Toroid(140, 45, 45, 90);which creates a toroid with a ring radius of 140 and a tube radius of 45. The last value rotates the tube's zero degree position.

Another advantage of using a class is that we can easily add additional functionality, for instance here are three methods used to control the colour / texture of the torus.
public void setTexture(Color color) {
    if (color != null) {
        PhongMaterial material = new PhongMaterial(color);
        setMaterial(material);
    }
}

public void setTexture(Image image) {
    if (image != null) {
        PhongMaterial material = new PhongMaterial();
        material.setDiffuseMap(image);
        setMaterial(material);
    }
}

public void setTexture(Image image, float nbrRingRepeats, float nbrTubeRepeats) {
    if (image != null) {
        PhongMaterial material = new PhongMaterial();
        material.setDiffuseMap(image);
        setMaterial(material);
    }
    if (nbrRingRepeats > 0 && nbrTubeRepeats > 0) {
        calcTexturePoints(nbrRingRepeats, nbrTubeRepeats);
    }
}
The ideas and code presented here could easily be expanded on to produce a 3D shapes library.